From Seed to Harvest: Understanding the Different Pumpkin Plant Stages
The life cycle of a pumpkin starts with tiny little seeds that are planted during the warmer months. This is when the growth begins; within days of sowing, sprouts will appear. As soon as these seedlings become established, they start putting out leaves and tendrils that allow them to attach themselves to supports like trellises or fences. At this point, it won’t be long before flowers begin blooming and fruits form on their stems.
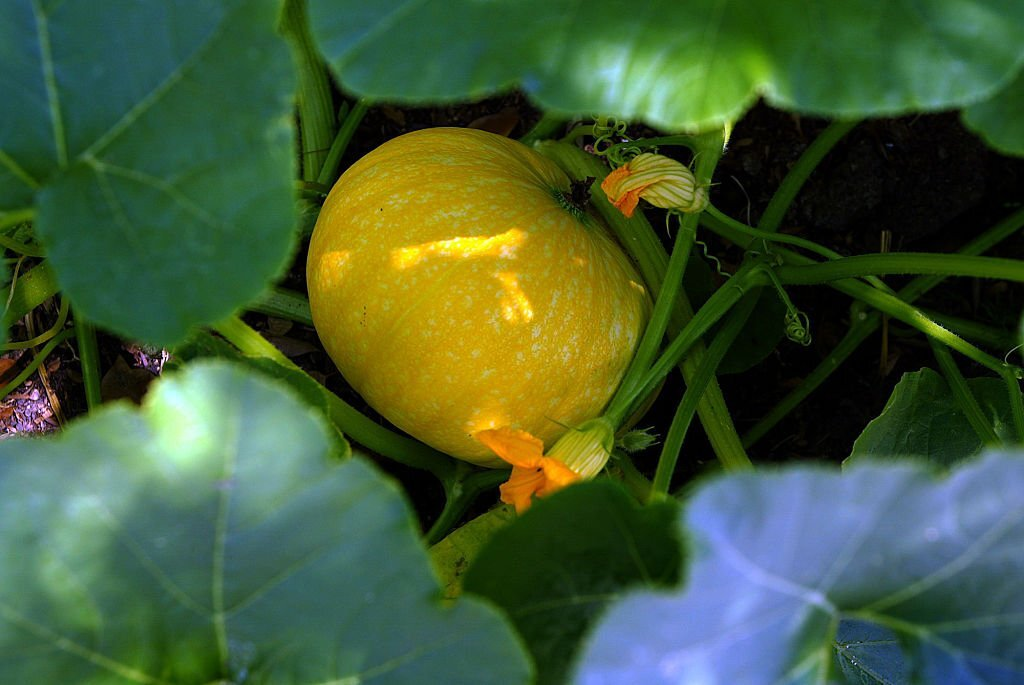
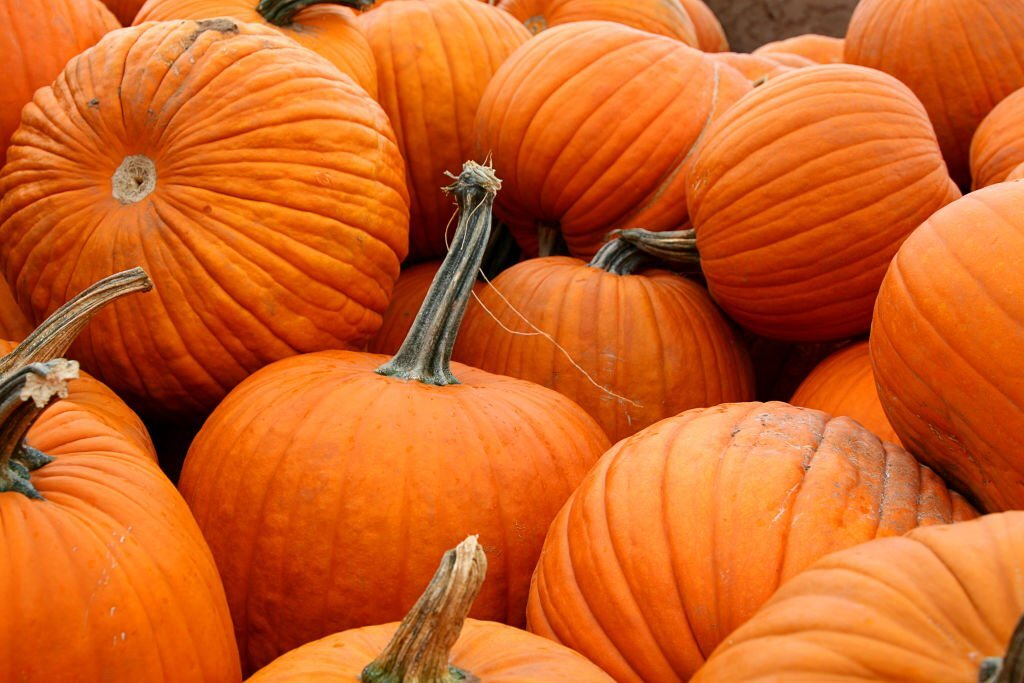
Once the fruit has formed, pumpkins need several weeks of sunlight and good weather conditions to reach maturity. They’ll go from green and small to large, orange orbs ready for harvesting! It’s amazing how much time and energy goes into growing such delicious treats – now, let’s dive deeper into each stage of the pumpkin plant lifecycle.
Planting: When To Begin And What You Need
When the cool breeze of fall fills the air and days are getting shorter, it’s time to get your pumpkin patch ready for planting. Planting pumpkin seeds is an exciting experience that can yield a bumper crop of pumpkins come harvest time! To ensure success in growing pumpkins from seed to harvest, you need some basic supplies: pumpkin seeds, garden soil, and containers or space in your garden.
You’ll want to choose a sunny spot with good drainage, as too much water can lead to rot and other diseases. Pumpkin plants also require plenty of room – they have long vines that will spread out over several feet. For this reason and due to their heavy fruit production, many people opt to start their pumpkin patch outdoors rather than indoors.
Once you’ve chosen the perfect spot for your patch, you’re ready to plant! You can purchase pre-packaged pumpkin seeds at most gardening supply stores or online retailers. If possible, look for organic varieties since these are free from potentially harmful chemicals or genetically modified organisms (GMOs). Once planted into moistened soil no more than two inches deep, be sure to keep it evenly watered until germination occurs.
With the right conditions in place and a bit of patience, soon you will begin seeing signs of life emerging through the soil. This marks the beginning of the germination stage, which we will discuss next…
Germination Stage: Signs Of Life
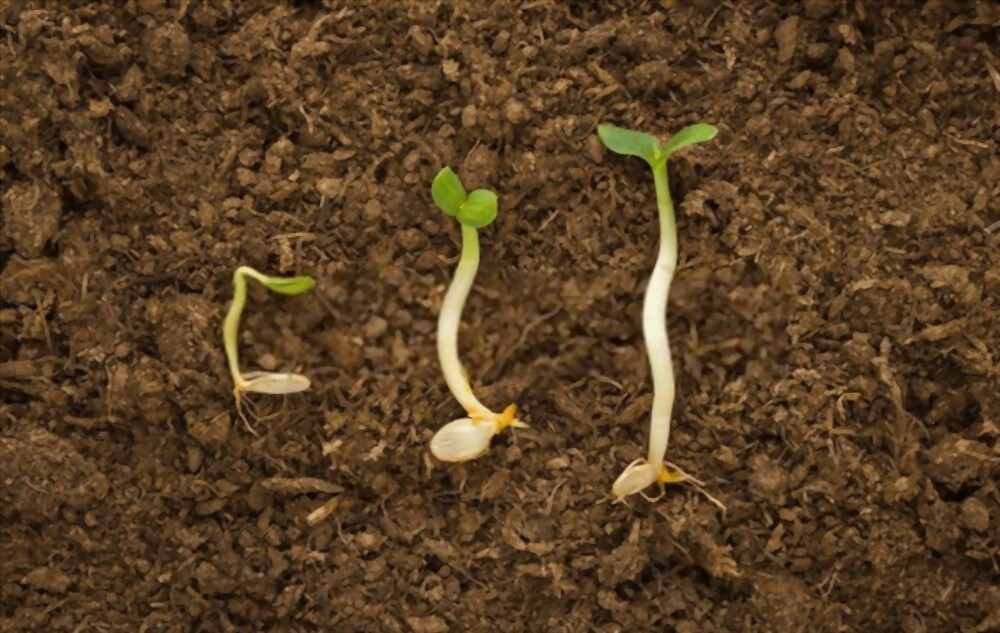
The germination stage is the first sign of life for pumpkin plants. This process typically begins when soil temperatures reach over 60°F, and can take anywhere from four to fourteen days depending on conditions. During this time, a small root will emerge from the pumpkin seed, while a hypocotyl (the embryonic stem) will push up through the soil surface. Once this occurs, you have reached what is known as the ‘germinated’ stage.
At this point in growth, it’s important to keep an eye out for signs of disease or pests that may be affecting your plant. If any are found, you should act quickly to address them before further damage is done. It’s also essential to ensure proper watering – too much water could cause molding or rot; too little water and your seeds won’t develop properly into a pumpkin seedling.
It’s not until after five to seven true leaves appear that you’ll know if you’re going to get a healthy harvest of pumpkins at the end of the season! As these leaves begin appearing, they will look like tiny versions of adult foliage but with longer petioles attached directly to their stems. These leaves are often described as being ‘crinkled’ in shape due to their waxy coating, which helps them retain moisture during dry spells.
As soon as these initial stages have been completed, it’s possible to move onto recognizing growth in regards to the first true leaves emerging on your pumpkin seedlings. With careful observation and good caretaking practices throughout all stages of development, you’ll be well-equipped for success come harvest time!
First True Leaves: Recognizing Growth
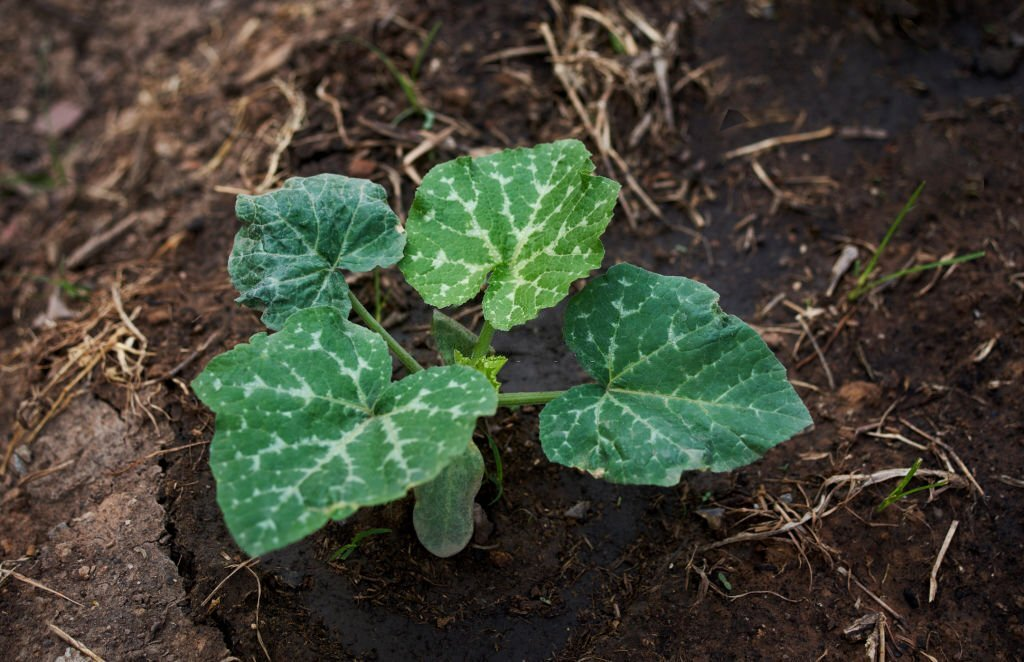
Now that the pumpkin plant has started to show signs of life, it’s time to watch for the first true leaves. After a few days of germination, two oval-shaped leaves will appear and begin photosynthesis – this is when they start taking in sunlight and turning it into energy. It’s exciting to recognize these as the pumpkin leaves!
The next stage after these initial leaves are visible is rapid vine growth. This happens because those two original leaves have taken in enough sunlight to help fuel their own expansion. As more vines emerge from the stem and spread outwards, so do more sets of true pumpkin leaves. Because each leaf is slightly different in size, shape, or color than its predecessor (or even siblings), you can easily distinguish them apart as separate entities.
As the plant continues growing and maturing, you’ll eventually see what looks like small yellow flowers forming on the vine tips. These tiny blossoms represent an important milestone since pollination must occur before fruit can form; without pollination by bees or other insects, there won’t be any pumpkins! So if you want your garden to yield some delicious fruits down the line, make sure that both male and female plants are present nearby.
We now know how to recognize true pumpkin leaves at every stage of development – but soon our plant will enter another phase where vines start growing: expansion of the plant.
Vines Start Growing: Expansion Of The Plant

After the pumpkin plants have been established, they start to produce vines. The vines are dark green and hairy, with a few small yellow flowers at their tips. As the vine grows, it will begin to develop small leaves and more flowers. These flowers can be either male or female, depending on what type of plant is grown. Male flower buds will appear first, followed by female flower buds later in the season.
The growth of these vines marks an important part in the development of pumpkins as this is when pollination takes place between male and female flowers. Once both types of flowers are present, bees will help to transport pollen from one flower to another, helping fertilize them for seed production. This process is essential for successful pumpkin growing and without adequate bee activity, there may not be enough viable seeds produced for future crop harvests.
In addition to bee-mediated pollination, proper nutrition also plays a huge role in pumpkin growth and development. It’s important to provide your pumpkin plants with all necessary nutrients, such as nitrogen, phosphorus, potassium, calcium and magnesium, so that they can grow properly throughout each stage of their lifecycle. Without sufficient amounts of these minerals, plants won’t reach their full potential, which could potentially result in poor yields come harvest time.
Knowing how much fertilizer needs to be applied to achieve optimal growth should depend on soil tests conducted before planting begins. With proper organic inputs like composted manure or slow-release granules being added into the soil beforehand, this helps ensure that nutrient levels remain consistent throughout the entire season, allowing you to get the best possible yield out of your pumpkins come harvest time! With good care and attention given during this stage of expansion, pumpkins can thrive until the blooming day arrives – when both male and female flowers appear, signaling that it’s nearly time for harvesting!
Blooming Day: Male And Female Flowers Appear
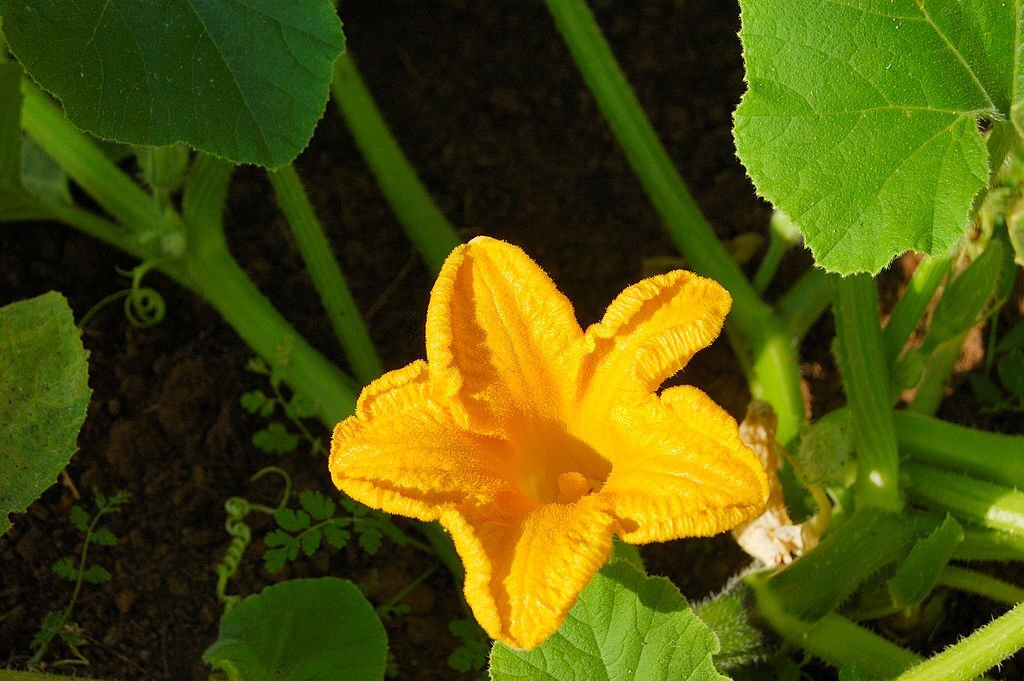
It’s like a dream come true! After weeks of waiting, the pumpkin plant finally blooms. On this day, male and female flowers appear together in an extraordinary display of beauty.
Like fireworks blossoming on a summer night, these vibrant yellow-orange petals captivate onlookers with their sweet fragrance. Male and female pumpkin flowers are both essential to producing pumpkins; however, they look slightly different from one another. Male flowers have long stems with single stamen at the center while females possess thick ovaries that develop into pumpkins later on.
Here’s what you need to know about pumpkin flower production:
* The male flower must pollinate the female flower for fruit formation to occur.
* Pumpkin plants can produce hundreds of male flowers before any female flowers start appearing.
* Female pumpkin flowers tend to grow more slowly than males due to the energy needed for fruit development.
* Unpollinated female flowers will eventually die off if not fertilized within 24 hours of opening.
The next stage is critical: if successful pollination occurs, then beautiful pumpkins may start forming soon after. It’s time now for us to move onto the exciting part – where we witness the transformation of tiny green fruits growing right before our eyes!
Fruit Development: Formation Of Pumpkins
After the blooming day of male and female flowers, pumpkin plants go through a period of fruit development. This stage is when pumpkins form on the vine and begin to mature. During this time, there are a variety of factors that affect how quickly or slowly pumpkins will grow. Below is a table outlining the different stages in the growth process:
| Growth Stages | Description | Lifespan |
| — |—|—|
|Female Pumpkin Formation |The first step in pumpkin formation is for female blossoms to be pollinated by bees, resulting in the ovary enlarging into what we know as a pumpkin fruit.|2-3 weeks|
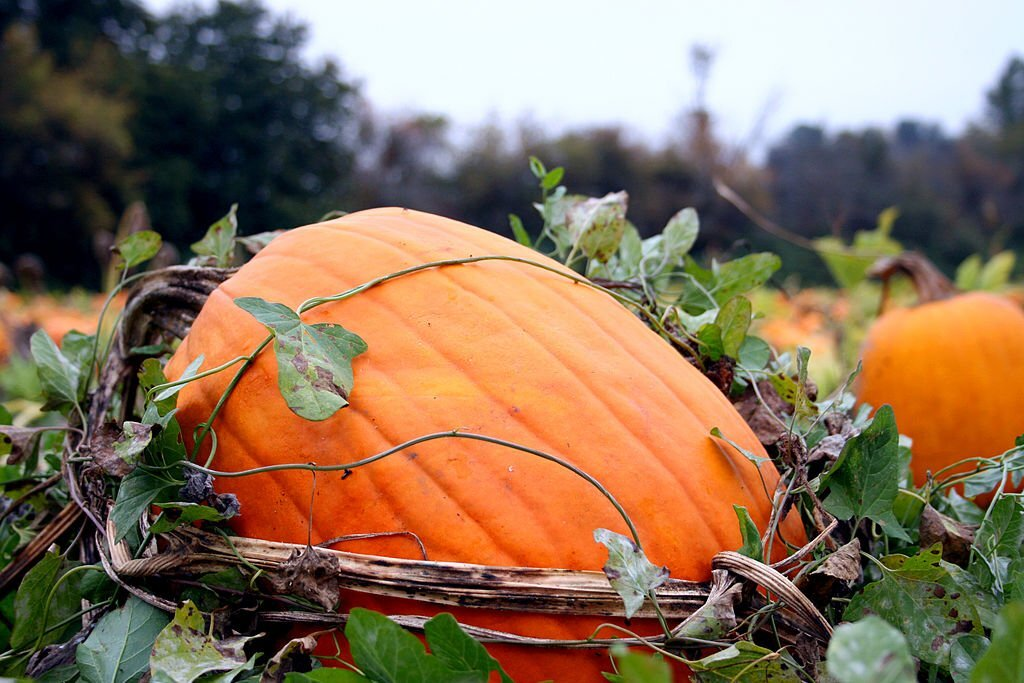
| Fruit Develops | As the days pass, the pumpkin begins to increase its size and ripen from green to bright orange. The rind starts to harden slightly too. | 2-4 weeks |
|Growth Continues | In this stage, the pumpkin continues to develop and gain weight while maturing on the vine until it reaches maximum size within its species type. | 3-6 weeks |
|Shelf Life Increases |At this point, sugar content increases and shelf life improves due to reduced water loss over time. |1 month+ |
In order for farmers to ensure successful harvests, they must monitor each individual pumpkin’s growth stages closely throughout its lifespan. By doing so, growers can make sure their pumpkins reach peak maturity before harvest time with optimal flavor quality and nutritional value intact.
Harvest Time: When Are Pumpkins Ready
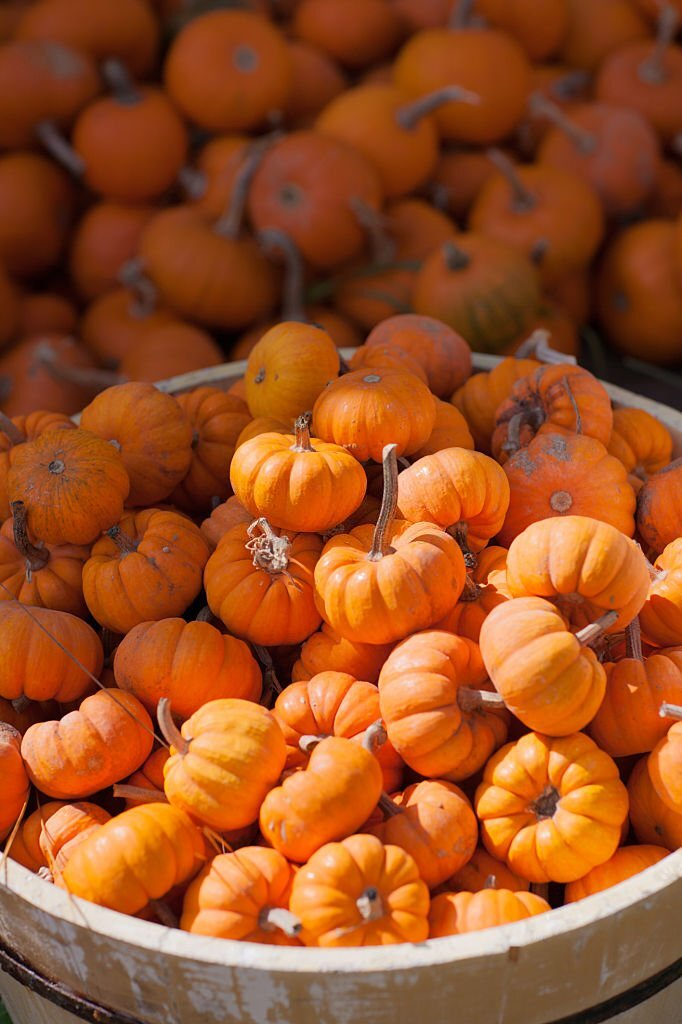
Harvesting pumpkins is a time-honored tradition of the fall season. When it comes to knowing when your pumpkin is ready, timing can be tricky. Baby pumpkins are typically ready in late summer, while large pumpkins can take much longer. However, there are some general guidelines you can follow to ensure that your pumpkin will be ripe and delicious for harvest day.
First and foremost, look at the color of the pumpkin’s skin. If its exterior has changed from green to orange or yellow – depending on the variety – then it’s likely to mature enough for harvesting. Also, inspect the stem; if it looks dry and withered then again, chances are good that your pumpkin is ready for picking. Additionally, gently press on the rind with your thumb; if it feels firm and doesn’t give way easily, then this, too, is an indication that the pumpkin is fully developed. Finally, another reliable sign of ripeness may come as a surprise: check beneath the plant leaves where sunlight cannot reach; these spots should feel warm to the touch – a sure sign that your Halloween jack-o’ lantern is ready to go!
The next step in harvesting requires a sharp knife or heavy garden shears (or even better yet, both). Cut through the stem just above where it attaches to the vine, ensuring not to damage any other parts of the plant in order to avoid disease later on down the road. After cutting off all of your desired pumpkins, carefully place them in a dark, cool area until they have hardened up sufficiently before carving them into Jack-o’-lanterns or cooking for pies and other tasty treats!
Now that you know how and when to pick your pumpkins properly, let’s move onto how to achieve large pumpkins…
Increasing Size: How To Achieve Large Pumpkins
After the harvest time, it’s time to focus on increasing size. If you want to grow giant pumpkins for competitions or just as a hobby, you’ll need to understand the stages of pumpkin growth and fruit development. Here are four steps that can help you achieve large pumpkins:
1. Plant at least two seeds of an Atlantic Giant variety in early spring when soil temperatures reach 55 degrees Fahrenheit or higher.
2. Thin out weak seedlings by snipping them with scissors so the strongest remain.
3. Provide plenty of water, fertilizer and sun exposure throughout all pumpkin growing stages until fruits start developing.
4. Maintain regular pruning during fruit development, so larger pumpkins receive more nutrients from their parent plant.
Large pumpkins take longer than smaller ones to develop, but following these steps will increase your chances of success significantly! With proper care and dedication, anyone can produce amazing results – even if they’re new to gardening or raising giant pumpkins! Now let’s explore why some gardeners find themselves unable to get big pumpkins despite their best efforts…
Decreasing Size: Reasons For Small Pumpkins
At first glance, it may appear that small pumpkins are simply a result of not having enough water or nutrients. But is this really the case? It turns out there’s more to it than just watering and feeding your pumpkin seedlings. While inadequate care can lead to smaller-than-normal fruit size, other factors play a role too.
One factor in small pumpkins has to do with pollination: if only one female flower on the plant is fertilized with pollen from the male flowers, then fewer fruits will form and their size will be affected as well. Other female flowers must also be fertilized for larger, healthier fruits. This means that when you have multiple blooms open at once, they should all be visited by bees so that each receives its own dose of pollen. When this doesn’t happen, many times, you’ll end up with small pumpkins instead of large ones.
The amount of sunlight received by the plant can also make a difference in pumpkin size. If there’s not enough direct light exposure during the day, then photosynthesis won’t occur at optimal levels and therefore, less sugar will be available for growth. The lack of sun can cause stunted development, which leads to smaller gourds or squash overall.
Another issue could involve overgrown vines – some gardeners let their plants grow unchecked and don’t prune them back regularly, which limits air circulation around the developing pumpkin itself, causing poor results in terms of size and shape. In addition, when inspecting potentially harvestable pumpkins look for those without any soft spots or green streaks along their skin; these indicate immature fruit and usually yield hollow sounds upon tapping due to an insufficiently developed rind.
These are all important things to keep in mind when trying to determine why your pumpkins seem unusually small – even though proper care does help ensure healthy growth and good yields! The pollination process is essential for ensuring fruits form correctly at a full size intended for harvesting later on down the line.
Pollination Process: Ensuring Fruits Form
Once the pumpkin plant has grown and matured, pollination must occur for fruits to form. The female flower of a pumpkin is large and yellow, with a swollen ovary at its base. A small paintbrush can be used to transfer pollen from the male pumpkin flowers to the female flowers. Male pumpkin flowers are found in clusters on long stalks that protrude above the foliage of the plant. They have thin, curved petals that open up into bright yellow flowers.
It’s important that insects or wind carry out pollination so that fertilization takes place between male and female plants. Pumpkin growers may also choose to manually hand-pollinate their crops by using a brush or other instrument. This process involves taking pollen from one flower and transferring it directly onto another flower, thus ensuring successful fertilization.
To ensure maximum yield, gardeners should remove any dead blossoms as well as those which aren’t ready for pollination yet (i.e., young buds). Once pollinated, these pumpkins will produce fruit over the next few weeks until harvest time arrives. It’s important to check regularly for signs of disease during this period, too – such as wilting foliage or discoloration – as pests often attack when conditions are right.
Now that we know how pumpkins get pollinated and grow successfully into mature fruits let’s look at identifying an issue related to red insects on the leaves of our crop plants.
Red Insects On Leaves: Identifying The Problem
The pumpkin plant is a symbol of vivid life. Starting from the germination process, it grows through multiple stages until its harvest time. As pumpkin plants grow, they naturally attract some pests that can disrupt their growth and productivity. One such pest is a small red insect on leaves with jagged edges, which can cause serious damage to the plant if left unchecked. To identify this problem quickly and effectively, there are certain signs one should look out for in order to determine whether or not these pests are present.
|Signs | Description |
|—–|————-|
|Dark Green Leaves | Male and female flowers appear together near oval-shaped leaves with dark green coloration; however, females turn yellowish-white when pollinated.|
|Pumpkin Skin Damage | Damaged skin may be covered in black spots as well as stippled marks caused by insect feeding activity.|
|Jagged Edges | Jagged edges along the leaf margins indicate an infestation of red insects usually found on cucurbits like squash, pumpkins and melons.|
Once you have identified the presence of these pesky creatures, it’s important to take action immediately and find natural solutions for pest control before any further damage occurs to your crops. In doing so, you will help ensure healthy pumpkin fruit production while also reducing potential losses due to crop destruction by pests.
Natural Solutions For Pest Control
Pumpkin plants are prone to insect pests, which can cause significant damage if left unchecked. Fortunately, there are natural solutions available for controlling these pests. The first step is to identify the type of pest and then research the best method of control. Beneficial insects such as ladybugs, lacewings, and praying mantises can help keep populations in check. Neem oil has also been found to be effective against many types of insect pests when applied directly to plant foliage.
Organic mulches made from bark or wood chips can provide a barrier between soil-borne pests and your pumpkin plants. Additionally, rotate crops each season and avoid planting pumpkins in the same spot year after year, as this helps reduce pest pressure significantly.
Fertilizing with organic sources like compost or manure will give your pumpkin plants plenty of nutrients while helping improve the overall health of the soil. Rich soils are essential for healthy pumpkin growth during all stages of its life cycle—from baby pumpkins through maturity. Avoid using synthetic fertilizers that contain harsh chemicals that can damage your crop over time.
It’s important to stay vigilant about inspecting your pumpkin plants regularly for signs of disease or pests so you can address problems quickly before they get out of hand. Taking appropriate measures now will set up your plants for success throughout their growing stage until harvest time arrives! With proper care, gardeners should expect an abundant yield come fall time. To ensure successful pumpkin harvests, it’s important to select suitable soil types for growing pumpkins accurately tailored to one’s climate and region conditions.
Soil Types For Growing Pumpkins
Take the case of John, a local farmer who wanted to grow pumpkins in his pumpkin patch. He knew that selecting the right soil was essential for optimal growth and yield. After some research, he found out that while pumpkin seeds can be grown indoors with any type of potting mix, it is better to plant them outside in nutrient-rich soil so they can thrive.
Here are four key things to consider when choosing a soil type for growing pumpkins:
* Planting pumpkin seeds outdoors requires loamy or sandy soils filled with plenty of organic matter.
* If planting indoors, select a well-drained light container soil that provides adequate drainage and aeration.
* A mixture of peat moss and compost will provide additional nutrients needed for healthy plants.
* The pH level should range between 6 – 7 on the acidic side as this helps create an environment more conducive to natural root development.
Knowing which soil types work best for growing pumpkins takes trial and error, but once you have identified what works for your specific climate and conditions, you’ll get great results every time! With careful consideration given to the quality of the chosen soil combined with proper care throughout its growth stages, there’s no reason why one cannot successfully grow their own pumpkin patch at home easily. This, in turn, leads us into our next section about understanding the necessary nutrients needed for healthy pumpkin plants.
Nutrients Needed For Healthy Pumpkin Plants
Once the soil types for growing pumpkins have been identified and prepared, it is time to get started with the pumpkin plant lifecycle. The first step of this process is planting squash seedlings in the garden bed. As soon as a stem has attached itself to one of these seedlings, it will begin its journey through the different stages of growth.
Throughout each stage, there are certain nutrients that need to be supplied in order for your pumpkin plants to develop healthily. Nitrogen helps promote healthy foliage while phosphorus encourages strong root systems and potassium aids overall fruit production. Calcium plays an important role in helping resist diseases, while magnesium ensures photosynthesis occurs correctly and sulfur increases calcium absorption rates by aiding protein synthesis processes.
In addition to supplying these essential nutrients, having rich organic matter incorporated into the soil can provide beneficial microbes that help enhance nutrient availability within the soil environment. This also provides additional water-holding capacity, which is helpful during times when temperatures rise, or rainfall decreases significantly.
Regular testing of both pH levels and nutrient composition should occur throughout the entire season so any deficiencies can be addressed quickly before any permanent damage occurs on your pumpkin plants. By taking proactive steps such as these, you ensure that your plants grow optimally throughout every stage until finally harvest day arrives! With all this hard work now done, you can sit back and enjoy the fruits (and vegetables!) of your labor – literally!
Benefits Of Home-Grown Pumpkins
Growing your own pumpkins offers a multitude of benefits. Not only is it an incredibly fun and rewarding experience, but you can also enjoy the fruits of your labor in more ways than one! Here are just a few of the advantages that come with growing pumpkins at home:
|Benefits |Description |
|———|————|
|Variety |You have access to many different pumpkin varieties, allowing you to experiment and find the perfect type for you. |
|Cost Savings |The cost savings from growing your own pumpkins is substantial – there’s no need to buy them from stores! |
|Nutrition | Pumpkins are packed with essential nutrients such as vitamin A, fiber, potassium, and manganese. |
|Harvest Fun | Harvesting your own pumpkins is an enjoyable activity for all ages; carefully lifting each one up off the soil surface will be sure to bring smiles all around! |
|Environmentally Friendly | Growing pumpkins helps reduce pollution since they don’t require any chemicals or fertilizers. Plus, they provide natural mulch, which enriches the soil while providing weed control. |
Once you’ve chosen your favorite variety and begun growing, you’ll soon see how much joy comes with watching it develop into a pumpkin-producing plant! From planting the seeds to harvesting their fruit, every step along this journey offers its own unique rewards. And when fall arrives and it’s time to carve those special designs into your very own homegrown masterpiece – well, then nothing else quite compares to that feeling either!
Frequently Asked Questions
✅What Is The Best Time Of Year To Plant Pumpkins?
When is the best time of year to plant pumpkins? This question has been a source of debate among gardeners and farmers for years, and it turns out that there are several factors to consider when deciding on an optimal planting season.
To begin with, let's look at the climatic conditions most conducive to successful pumpkin growth:
- Temperature: Pumpkins require consistent warm temperatures (between 65°F - 95°F) during their growing period in order to develop properly.
- Rainfall: Adequate rainfall or irrigation is needed for healthy growth; however, too much water can lead to fungal diseases like powdery mildew.
- Sunlight: Pumpkins need direct sunlight for 6-8 hours per day for maximum yield.
These climate requirements mean that the ideal time for planting pumpkins depends largely on where you live and what kind of weather you have throughout the year. Generally speaking, early summer is considered prime pumpkin planting time in areas with temperate climates – allowing enough time to harvest before frost hits in late fall/early winter. Planting earlier than mid-June may result in stunted plants due to cooler temperatures while waiting until later than July could cause your crops not getting mature by the first frost date.
Apart from climate considerations, it’s important to take into account soil temperature as well. For best results, wait until the average daily air temperature reaches 70°F consistently over several days and then check that the soil near your intended spot is at least 60°F deep down – otherwise, seedlings won't be able to make contact with moisture underground which can lead them drying out quickly after germination. Additionally, if you want more control over how big your pumpkins get, you should also plan ahead so they don't exceed two feet across before harvesting since anything larger might not ripen fully before cold weather sets in again.
In short, timing matters when it comes to pumpkin planting! If you're looking forward to having a productive crop of plump orange orbs come autumn time, then planning carefully according to regional climate patterns as well as local soil conditions will be key to achieving success with your own patch of jack o'lanterns this season!
✅How Can I Tell If My Pumpkin Seeds Have Germinated?
It can be exciting to watch a pumpkin seed sprout and grow. Knowing when the seeds have germinated is an important step in growing pumpkins, so understanding how to tell if your seeds are ready for planting is key.
The first sign that your pumpkin seeds have germinated will be the appearance of a small taproot emerging from the seed coat. This root is often white or cream-colored and should look like a baby carrot top with its feathery ends. If you notice this protruding from your pumpkin seed, it's likely that the seed has begun to sprout!
Another way to confirm whether your pumpkin seeds have started to germinate is by looking at them under magnification. A 10x magnifying glass will allow you to see tiny tubercles on the surface of each seed; these indicate where new growth will begin once they’ve been exposed to water and light. The presence of these tubercles confirms that the seeds are beginning their journey toward becoming plants.
Finally, after several days, depending on temperature and humidity levels, young leaves will start appearing between the two halves of the split shell. At this point, you'll know for sure that your pumpkin seeds have successfully germinated and are now ready for transplanting into soil or containers of choice.
✅Is There A Way To Encourage Larger Pumpkins?
Growing larger pumpkins is an exciting challenge for gardeners. If you're looking to get the most out of your pumpkin patch, there are some steps you can take to maximize its size and yield. Here's a quick guide on how to encourage bigger pumpkins:
- Plant in full sun with plenty of space between plants
- Use nutrient-rich soil with adequate drainage
- Water regularly and deeply during dry spells
- Supplement with additional fertilizer as needed
These basic tips will help ensure that your pumpkins have everything they need to grow big and strong! Additionally, when it comes time to pollinate the flowers, hand pollination may be necessary if bees or other natural pollinators are not plentiful. This involves using a small brush or cotton swab to transfer pollen from one flower to another. Doing this ensures cross-pollination takes place, which helps produce healthy and hearty fruit.
It's also important to monitor the vines throughout the season for signs of disease or pests like aphids or squash bugs. Be sure to remove any diseased leaves promptly so as not to spread infection around the garden. And don't forget about pruning back extra foliage and deadheading spent flowers — both activities promote more vigorous growth and healthier fruits!
Finally, once harvest nears, choose only a few select fruits per vine for maximum size potential; leaving too many on each plant limits the number of nutrients available for them all, resulting in smaller overall yields.
✅What Can I Do If I Spot Red Insects On My Pumpkin Plant?
It can be disheartening to see red insects on your pumpkin plant. It's like watching a thief sneak into your garden, stealing away the fruits of your labor. But there are steps you can take to keep these pests at bay and ensure that your pumpkins flourish.
First, it is important to identify what type of insect has arrived in your garden. Many small beetles feed on pumpkin plants, such as flea beetles and cucumber beetles. If you're able to recognize them properly, then you'll know which treatments will work best for eliminating the infestation.
The next step is to decide how severe the infestation is - if it's only a few bugs, handpicking might be enough; but if they've spread across multiple areas of the plant or there are many of them present, then using an organic pesticide may be necessary. Natural solutions like neem oil or horticultural soap can help get rid of the insects without harming beneficial pollinators or other wildlife. Additionally, setting up some yellow sticky traps around the affected area will help catch any stragglers before they cause too much damage.
Finally, while treating the problem directly helps control the pest population and protect your crop, prevention should also be taken into consideration going forward. Crop rotation can help reduce potential outbreaks by ensuring that different types of crops occupy each spot in subsequent years; this way, any remaining eggs from previous infestations won't have a chance to hatch and re-infest new growths. Also, make sure not to overwater or overfertilize: both create conditions where pests thrive!
By taking quick action when spotting red insects on their pumpkin plant and following proactive preventative measures thereafter, gardeners can effectively manage any pest issues that arise so that their harvest remains abundant and healthy for years to come.
✅What Type Of Soil Is Best For Growing Pumpkins?
One of the most important aspects to consider when growing pumpkins is what kind of soil you'll be using. It's essential to choose soil that is well-draining and rich in organic material, such as compost or manure. A pH level between 6.0 and 7.5 will work best for pumpkin plants.
When selecting your soil, make sure it has plenty of nutrients available for the plant to absorb. For example, adding phosphorus, potassium and nitrogen can help ensure optimal growth conditions. Additionally, adding mulch around the base of the plant can help keep moisture levels consistent while also preventing weeds from competing with your pumpkin plants for resources like water and sunlight.
It's important to note that if you're planting pumpkins directly into the ground instead of containers, then you should use an area with good drainage since standing water can cause root rot and other issues which could potentially kill off your crop before it even starts producing fruit. If possible, try testing out different soils in pots first before settling on one for direct sowing into the ground.
Overall, finding the perfect type of soil for growing pumpkins takes some trial and error but ultimately results in healthier plants that are more likely to produce bigger yields come harvest time! With careful consideration of nutrient availability, proper drainage capabilities and weed prevention methods, success is just around the corner!
Conclusion
The pumpkin is one of the most beloved seasonal plants, with its bright orange color and sweet flavor providing a foundation for many festive dishes. But what many people don’t realize is that behind every great pumpkin lies hard work. Planting pumpkins at the right time of year, checking for germination, encouraging larger growth and dealing with any pests are all vital steps in growing healthy pumpkins.
So if you’re planning on planting some pumpkins this season, make sure you know exactly what to do! Don’t forget to check your soil type before sowing – otherwise, your efforts may go down the drain when it comes to harvesting those delicious gourds. And watch out for those pesky red insects – they can wreak havoc on the health of your plant if left unchecked.
With enough patience and care, you’ll be able to enjoy a successful crop of beautiful pumpkins come autumn!
Disclaimer: GardeningNorm is a participant in the Amazon Services LLC Associates Program and may receive a commission if you purchase a product via a link on this page.. However, this does not impact our reviews.Read the full disclosure here.