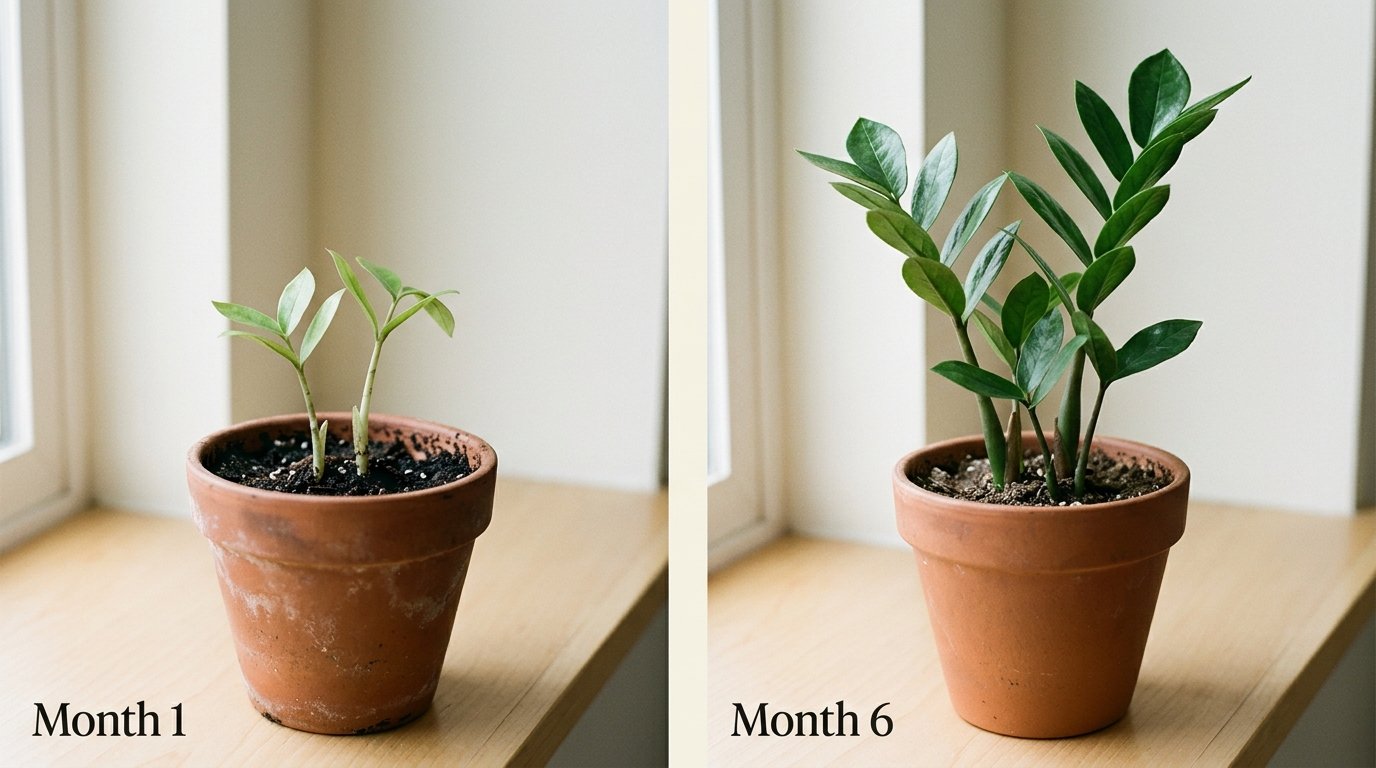
How to propagate ZZ plant: 3 methods, real timelines, honest success rates
Searching for how to propagate ZZ plant cuttings the easiest way? Of all the houseplants you can grow at home, the ZZ is one of the most forgiving — even a first-time propagation usually produces a healthy new plant. This guide explains how to propagate a ZZ plant from stems, foliage, or division, plus the realistic timeline and odds for each method.
If you’ve grown houseplants before, the steps will feel familiar. If you haven’t, the guide below walks you through every choice — including how to spot a failed new plant before you waste another month waiting for roots that aren’t coming.
Most ZZ the rooting process guides leave one question unanswered: “How likely is this actually going to work?” Leaf cuttings succeed roughly 30–50% of the time, stalk the rooting cycle methods 70–85%, division 95%+. This guide picks the right method for your situation and tells you the realistic timeline before you start.
The comparison table below is the most important section — it’s the only one most readers actually need.
If you’ve been searching for how to propagate ZZ sections, or how to propagate a ZZ from a single frond, this ZZ rooting guide answers both — with realistic timelines, honest success rates, and practical advice on how to root a ZZ in either water or substrate.
Quick decision: which method should you use?
Don’t see your case? Skim the comparison table next, then jump to the method that fits.
Method comparison table (the most important section)
Success rates are conservative estimates synthesised from documented experiments and active hobbyist communities. Actual results vary significantly with light, temperature, humidity, houseplant health, and the stalk itself. Use these as planning ranges, not guarantees.
Two things this table tells you that other guides don’t:1. Leaf cuttings are not “a great way to multiply your collection.” They’re a coin flip. If your only goal is more ZZ plant plants, division is the only method that’s nearly guaranteed.
2. The hybrid water-to-developing medium method outperforms either pure method when combined with bottom heat. We’ll cover it in Method 1.
Bottom line: If you have a mature ZZ plant with multiple stalks, division wins on every metric — fastest, easiest, ~95% success rate. Use cuttings only when division isn’t available.
Method 1 — stalk cuttings (water vs potting medium vs hybrid)
When to use this method
Pick stem propagation methods if all of the following apply:
– You have a healthy stalk at least 4 inches long that you can sacrifice or that broke off accidentally.
– The mother cutting has 3+ stalks — losing one won’t make it look bare.
– You’re prepared to wait 3–6 months for transplant-ready roots.
– You’re okay with 70–85% odds (not the 95%+ of division).
How to take a stalk cutting

- Choose a stalk with dense, dark green, glossy the foliage — pale or yellowing stalks propagate poorly.
- Cut at the very base of the stalk with sterile pruning shears, as close to the rhizome as possible.
- Keep the foliage attached. Do not strip them.
- Optional but recommended: let the cut end callus over for 24–48 hours on a paper towel, out of direct sun. This reduces decay risk in water.
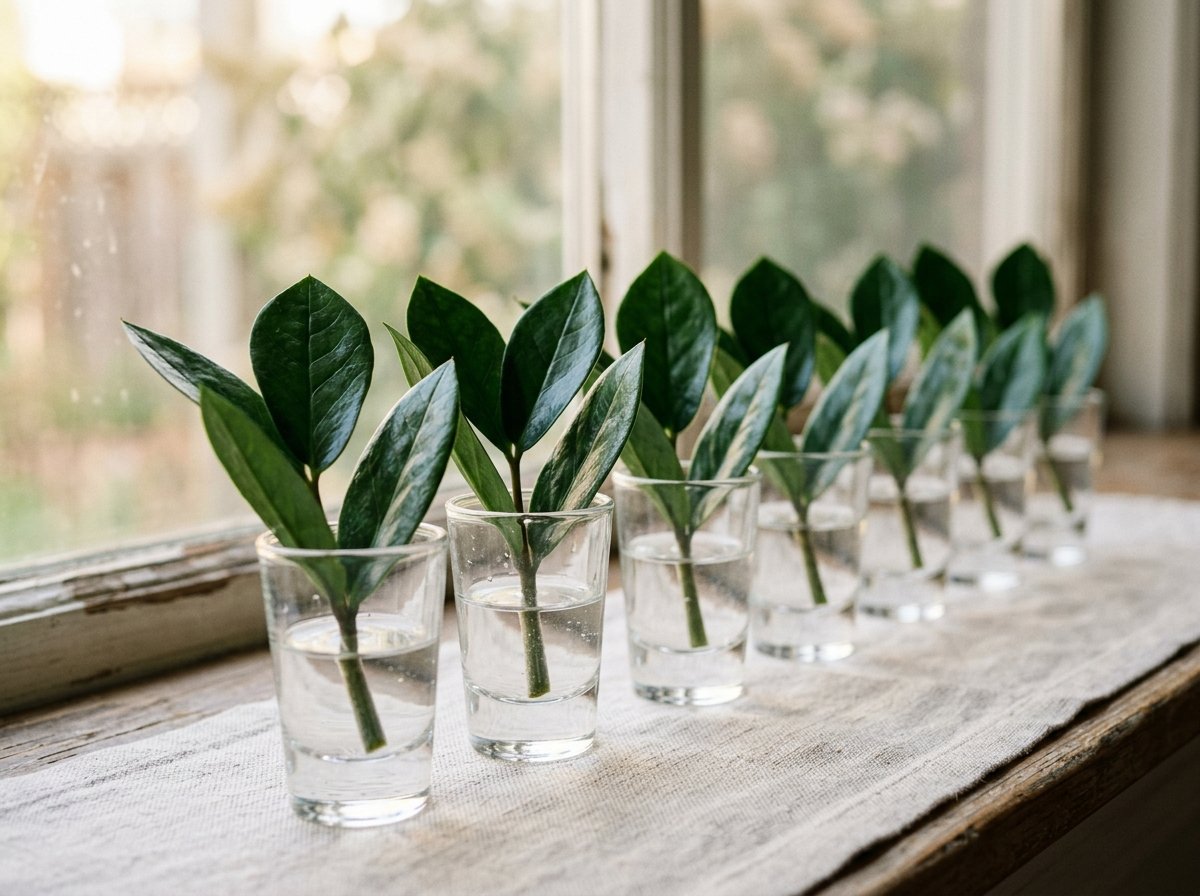
Water route — pros, cons, timeline
- Pros: You can see the rhizome developing. Beginners stay engaged.
- Cons: Roots grown in water are weaker and need to adapt to substrate later. Rotting risk if water gets dirty.
- Setup: Submerge only the cut end. The leaf cuttings must stay above water — the foliage touching water rotting fast.
- Maintenance: Change water weekly. Wash the container with dish soap each change (this is the single most underrated tip — bacterial film causes most water-prop failures).
- When to transplant: Wait until roots reach 1+ inch and you can see at least one rhizome emerging at the base.
- Realistic timeline: 3–6 months in warm conditions.
Soil route — pros, cons, timeline
- Pros: No transplant shock. Stronger roots from the start.
- Cons: You can’t see what’s happening. Harder to spot decay before it spreads.
- Setup: Equal parts potting soil and perlite (or coconut coir). Insert the calloused end 1–1.5 inches deep.
- Maintenance: Keep moist, not soggy. Let the surface dry between waterings. Do not let it dry out completely.
- When to transplant: A gentle tug should meet resistance after 3–5 months. That’s roots holding it down.
- Realistic timeline: 3–5 months.
The hybrid water-to-soil method (recommended)

This is the method most experimental growers eventually settle on:
1. Start in water as above.
2. Once the rhizome appears (typically 2–3 months) and roots reach about 0.5 inch — transplant to soil right away, before roots get too long.
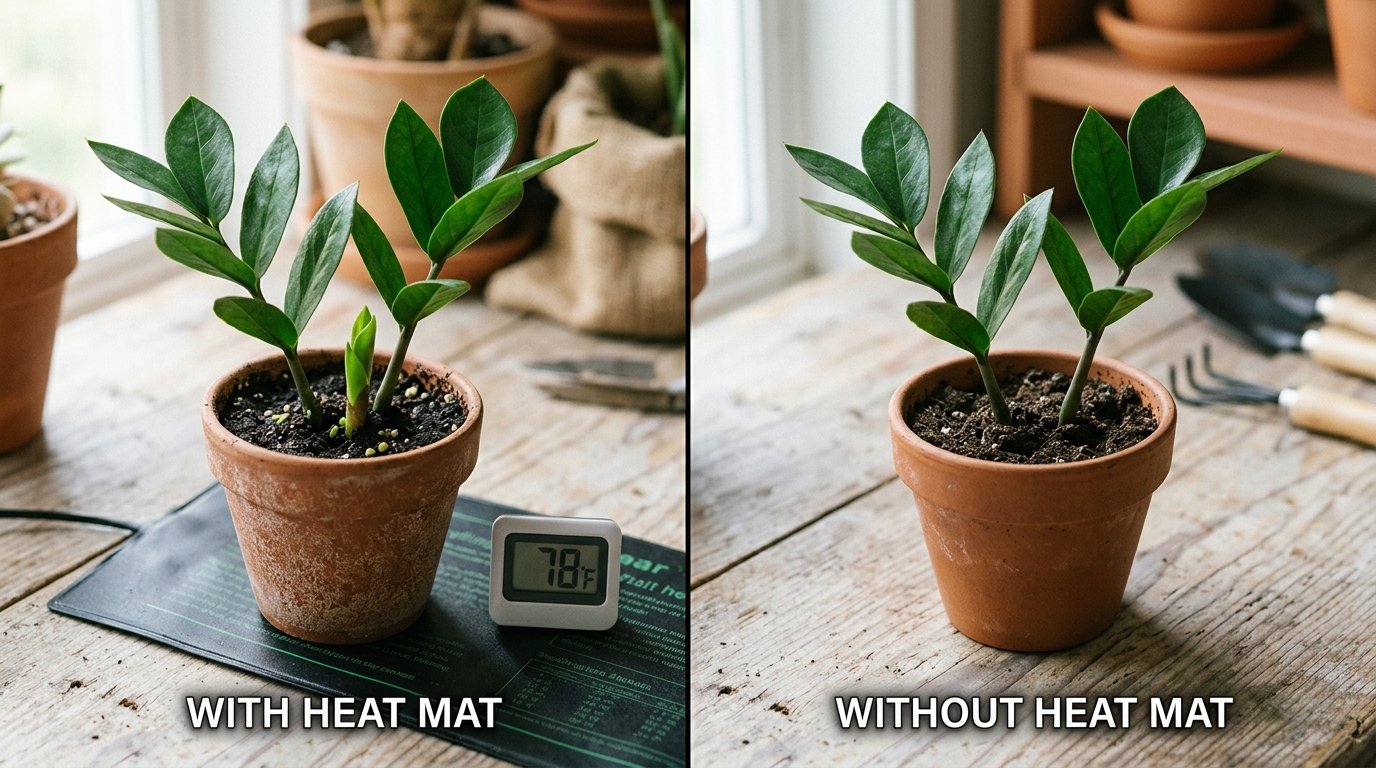
3. Place the new pot on a heating mat set to 76–80°F.
4. Maintain bottom heat for 2–3 months.
Documented experiments show ZZ plant plants on bottom heat produce visible new shoots in around 8 months. The same specimens without bottom heat had no shoots at the 8-month mark and only started shooting at 10+ months. Heat is the single biggest accelerator.
Method 2 — Leaf cuttings (the lowest-success method, the highest-patience one)
Most guides bury this fact. Stating it plainly: leaf cuttings have a realistic success rate of 30–50%. Plan to start 6–10 foliage at once if you want to end up with 2–3 plants.
When to use this method (and when not)
- Use it when: You have stranded leaf cuttings (a blade fell during repotting, you trimmed a leggy specimen, the only option you have is the foliage).
- Do not use it when: You have a mature houseplant — division is faster and nearly always succeeds.
- Do not use it when: You need rooted plants by a specific date within 6 months — the timeline is unreliable.
How to take leaf cuttings
- Cut or twist the frond off with the petiole (the small stalk section that joins the blade to the main stalk). Without the petiole, the frond will not produce a rhizome.
- The petiole length doesn’t have to be perfect — even 0.5 inch works.
- Skip callusing for leaves; the petiole is small enough that water exposure is fine immediately.
Water vs soil for leaves
Practical tip:Use shallow containers (½ inch of water). Submerge only the petiole base — leaves themselves must stay dry. Change water weekly.
Realistic expectation
Out of 10 leaves started in identical conditions, expect:
– 2–3 to produce a rhizome and shoot within 8–10 months.
– 3–4 to produce a rhizome that never shoots (rhizome stalls).
– 3–5 to rotting or yellow without producing anything.
This is normal. It’s not a sign you’re doing something wrong.
Manage your expectations: Out of 10 ZZ plant leaves started in identical conditions, expect only 2–3 to actually shoot within 8–10 months. This is normal — leaf cuttings are biologically a coin flip, not a sign you’re doing anything wrong.
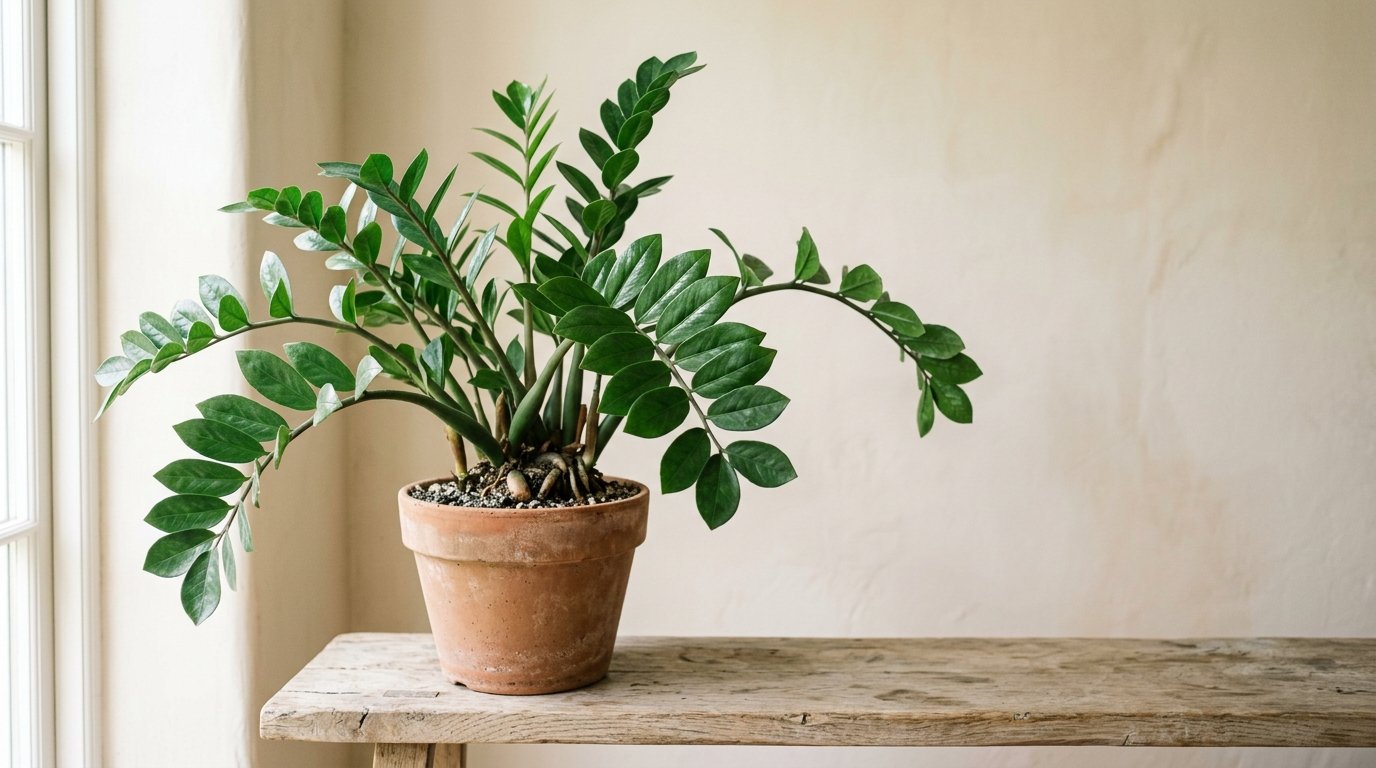
Method 3 — Division (highest success, requires mature cutting)
If your ZZ plant has 2+ visible stems coming out of the soil and is at least 2–3 years old, this is the method to use. Almost guaranteed result, fastest recovery, no waiting for a rhizome to develop.
When you can use this
- The specimen has been in its current pot for 1+ year.
- You can see 2+ distinct stems emerging from the soil.
- The plant is generally healthy — limp or yellowing plants don’t divide well.
Two-day prep (the trick most guides skip)
Stop watering 2 days before you plan to divide. Slightly dry soil makes the rhizomes easier to separate without breaking them. Wet rhizomes are brittle and the divisions fall apart.
Step-by-step division
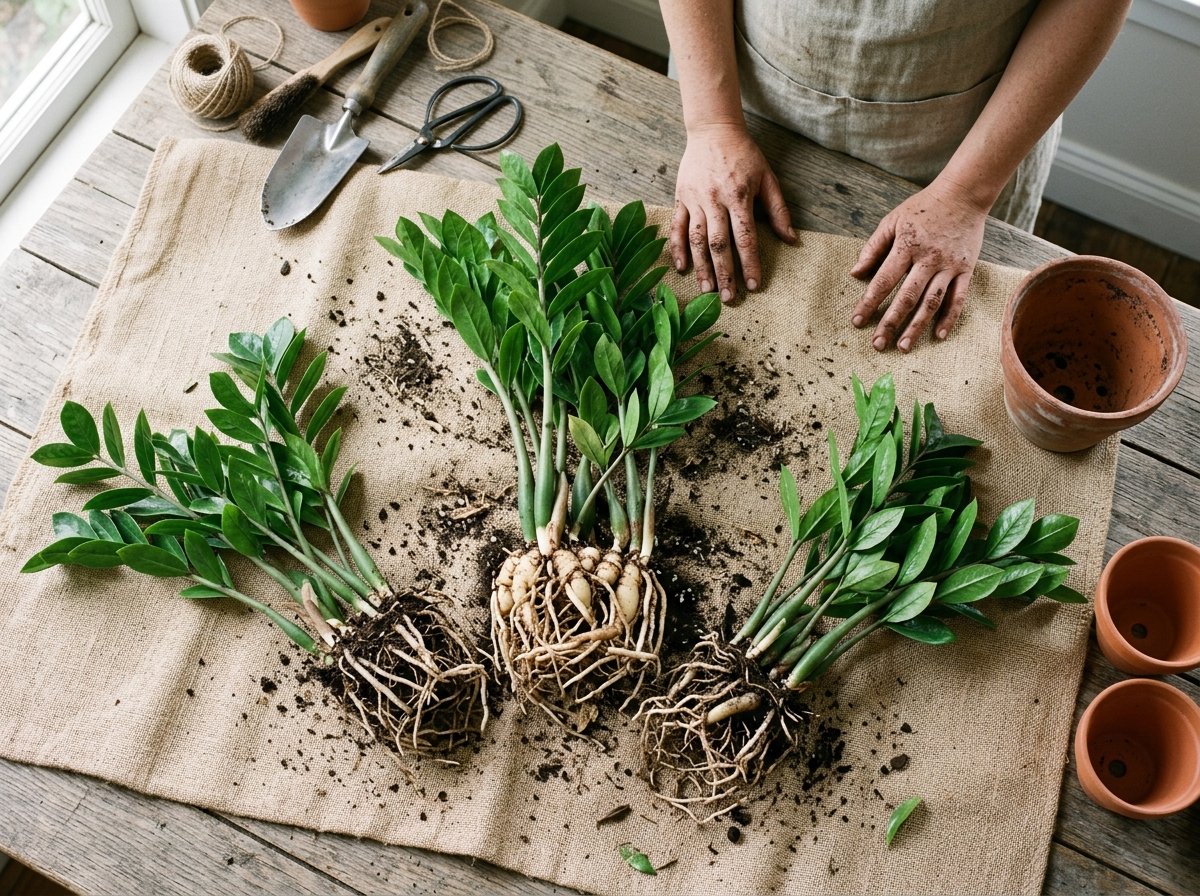
- Remove the ZZ plant from its pot. Tap the sides if needed.
- Gently shake or rinse off the old soil to expose the rhizomes.
- Identify natural separation points — most ZZ plant plants have 2–4 distinct rhizome clusters.
- Use your hands when possible. Pull the rhizomes apart at natural points. Use a sharp, disinfected knife only when you can’t separate by hand.
- Each division must have at least one rhizome with attached roots and at least one stem.
- Pot each division in well-draining soil (potting mix + perlite) at the same depth as the original.
- Water once thoroughly, then leave alone for 1–2 weeks.
Why this is the fastest method by far
You’re not waiting for a new rhizome to appear. The rhizome is already there. Recovery time is 1–2 weeks of slight droop, then the ZZ plant resumes growth. Compare that to 3–9 months for pieces.
One realistic warning
Some leaves may yellow and drop in the first 2 weeks after division. This is normal stress response. Don’t overwater — that’s the most common post-division mistake.
Why temperature matters more than light (heating mat A/B)
Every guide says “bright indirect light.” That’s correct but secondary. The hidden variable is soil temperature.
ZZ plant rhizome formation is essentially blocked below 70°F and dramatically accelerated between 76–86°F. Documented experiments comparing identical sections with and without a heating mat:
Practical takeaways:– A $20 seedling heating mat is the single best ROI in ZZ plant propagation.
– If you can’t use a heating mat, propagate in late spring or summer when ambient temperatures are higher.
– Winter propagation in cool homes (below 70°F) without bottom heat will likely fail or stall indefinitely.
Best ROI in ZZ propagation: A $20 seedling heating mat roughly halves your wait time. If you can only spend money on one thing for ZZ propagation, this is it — well above grow lights, rooting hormone, or premium soil mixes.
When to start: timing and seasonality
Generic guides say “spring or summer.” Here’s the more useful version:
If you absolutely must start in winter, use:
– A heating mat set to 76–80°F.
– A grow light providing 8–10 hours of bright indirect light.
– A clear plastic cover or propagation chamber to maintain humidity above 60%.
Signs your propagation has failed (and when to start over)
Most failed propagations could have been recognised 2–4 weeks earlier. Save the time and start fresh sooner.
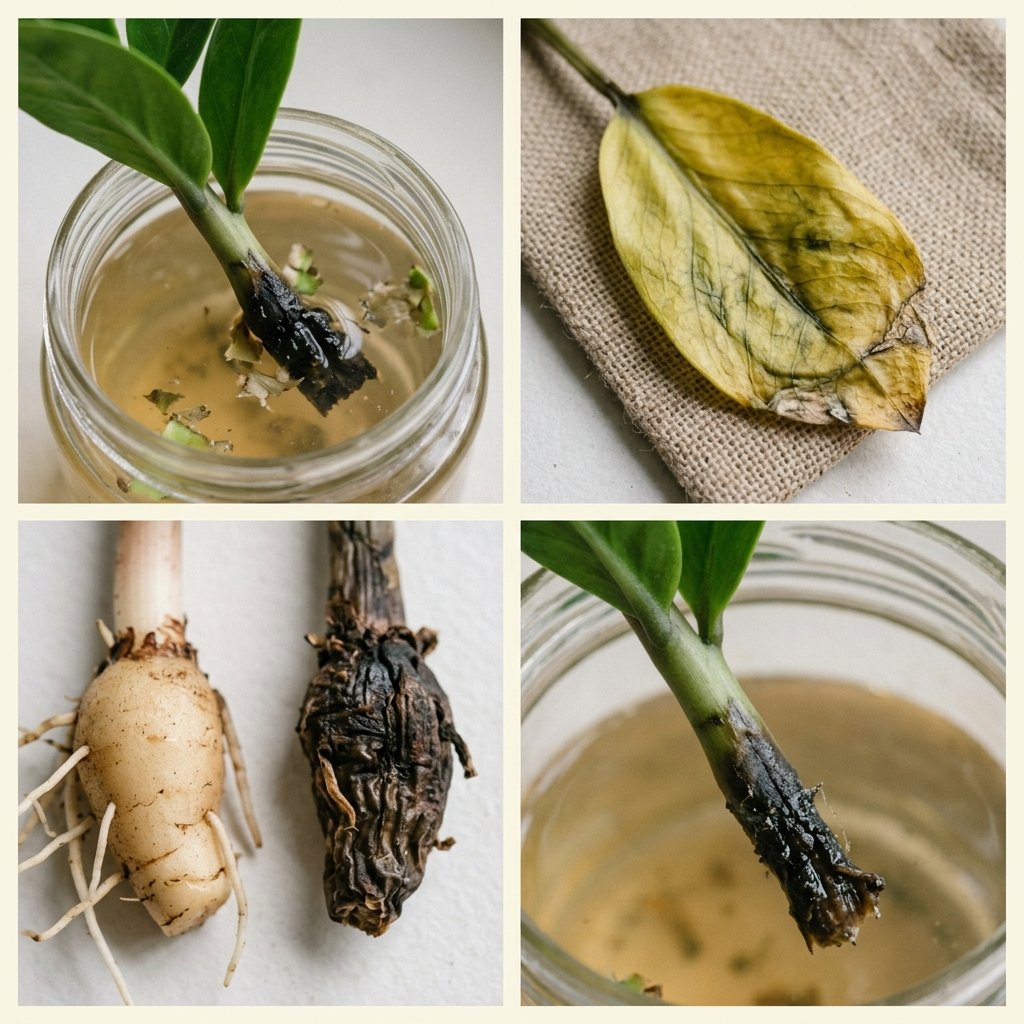
Early signs (week 1–4)
- Cut end turns black or mushy within 1–2 weeks → bacterial rotting. Discard immediately.
- Water cloudy, smells sour → contaminated. Discard the pieces if any sit in this water more than 48 hours.
- Leaves yellow rapidly within first 2 weeks → section was already weak. Discard.
Mid-stage signs (month 2–4)
- Leaves slowly yellow from base to tip over weeks → lighting too low or chronic over-watering. Move to brighter spot, dry out slightly.
- No rhizome visible after 4 months in water at room temp → likely won’t develop. Add bottom heat or discard.
- Soft mushy stem at the soil/water line → decay starting. Cut above the soft part, re-callus, restart.
Late stage (month 6+)
- Rhizome developed but no shoots emerging after 6+ months → “rhizome stall.” Possible to wait it out, but most never shoot. Pot it and forget it for another 3–6 months — sometimes works.
- Plants in soil show no resistance when gently tugged after 6 months → no roots emerged. Discard.
When to definitively start over
- 8+ months for stem propagation methods without any rhizome.
- 10+ months for leaf cuttings without any rhizome.
- Black decomposition at any stage.
- Cloudy/contaminated water that wasn’t changed within 48 hours.
Propagating ZZ plant varieties (Raven, Zenzi, Variegated)
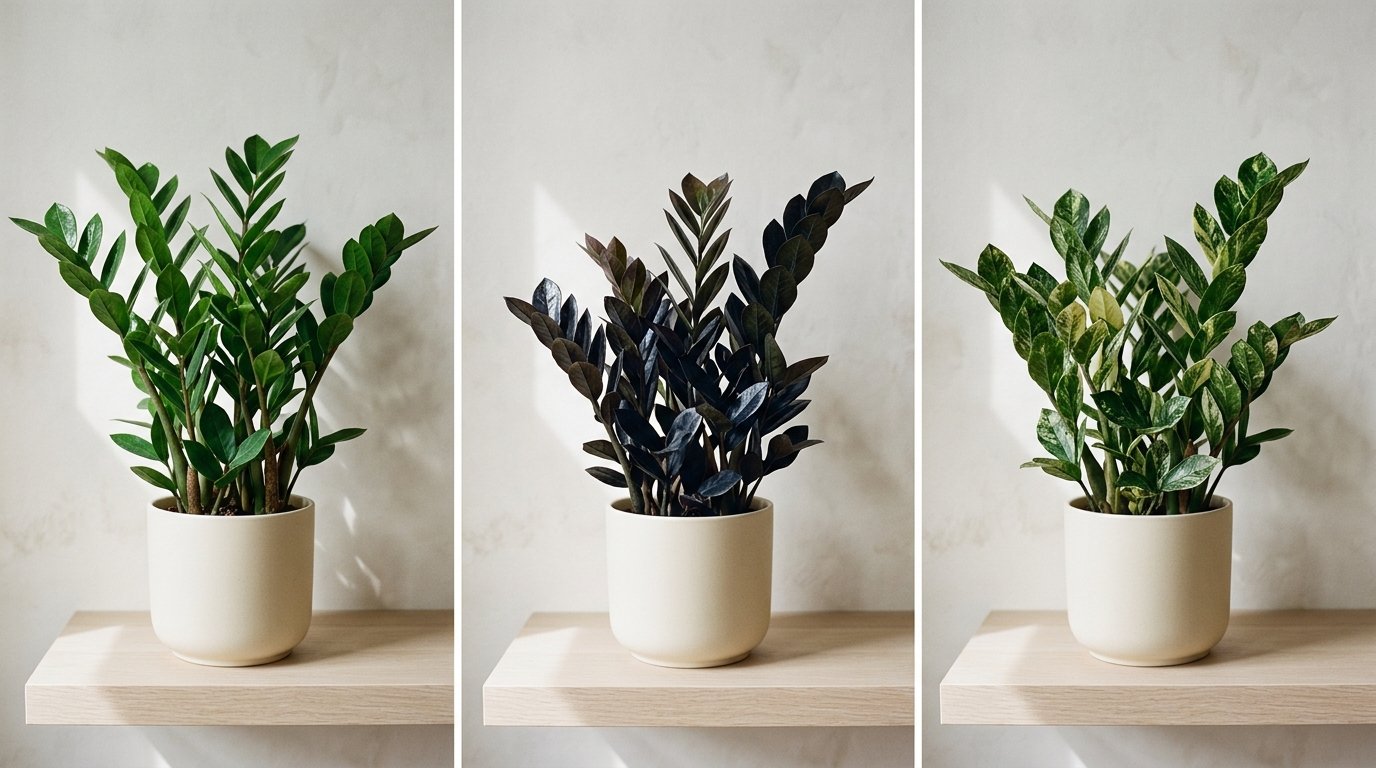
Most guides treat ZZ plant as one plant. Cultivars behave differently.
ZZ plant Raven (dark purple-black foliage)
- Lower chlorophyll → slower rhizome formation.
- Add 1–2 months to typical timelines.
- New shoots emerge bright green and darken with light exposure over 4–8 weeks.
- Heating mat strongly recommended.
ZZ plant Zenzi (compact, tightly clustered foliage)
- Smaller rhizomes but more of them per plant.
- Easier to divide than the standard ZZ — often has 4+ distinct clusters in a 6-inch pot.
- Stalks root at typical rate.
Variegated ZZ (white/cream streaks)
- Critical caveat: variegated cultivars often revert to fully green when propagated from specimens or even division. The variegation is unstable.
- Division is the most reliable way to preserve variegation, but even then 30–50% of divisions revert.
- Leaf cuttings almost always revert to green.
- If you want guaranteed variegation, it’s usually cheaper and more reliable to buy another variegated plant than to propagate.
After propagation: caring for new ZZ plant in the first year
Most guides stop at “transplant your rooted piece.” Here’s what comes next.
Month 1–3 after transplant
- Water sparingly — half of what you’d give a mature ZZ plant.
- Bright indirect light, no direct sun.
- Don’t fertilise. Roots are still establishing.
Month 3–6
- Increase watering to about 75% of mature ZZ plant schedule.
- First diluted fertiliser feed — quarter strength of a balanced houseplant fertiliser (e.g. NPK 10-10-10 or 20-20-20 diluted to one-quarter of label dose).
- Expect 1–2 new shoots in this period.
Month 6–12
- Resume normal ZZ plant watering schedule (every 2–3 weeks).
- Half-strength fertiliser monthly during growing season (spring–summer).
- Re-pot only if rootbound — most propagated ZZs don’t need re-potting until year 2.
What’s normal
- Slow growth — even healthy propagated ZZs put out 2–4 new stems in their first year.
- Brief leaf drop after transplant — recovery within 2–3 weeks.
What’s not normal
- More than 30% of leaves dropping after transplant.
- No new growth at all in 12 months — propagation likely failed silently; investigate.
About this guide
This guide synthesises three sources:
- Documented propagation experiments — including the Ohio Tropics 10-month leaf propagation experiment that produced the heating-mat-vs-no-heating-mat timeline data cited above.
- University horticultural research — Purdue and Michigan State publications on Zamioculcas zamiifolia rhizome formation under controlled temperature conditions.
- Consensus practice from active hobbyist communities — primarily reflected in the success rate ranges and the failure-sign checklist.
Success rate ranges are conservative estimates rounded from multiple sources. Actual results vary significantly with light, temperature, humidity, plant health, and the specific cutting taken.
Reading the roots: what healthy roots look like
The first roots that emerge are pale, fine, and fragile. Healthy roots stay
white or pale tan; black or mushy roots indicate decay and the cutting should
be discarded. Strong roots branch within a few weeks and slowly thicken into a
permanent root system. As the roots build outward, you’ll see fresh roots
pushing through drainage holes — that’s a good sign of established root
growth and a cue that those roots are ready for repotting in a slightly larger
pot. Keep the substrate barely moist while the roots are still young; mature
roots tolerate dry periods, but new roots dry out and die fast.
Practical setup checklist for ZZ plant propagation
A few last practical notes from experienced ZZ plant owners. Wear gloves when
working with sap — the calcium oxalate crystals can cause skin irritation in
sensitive people. ZZ plants and other houseplants share the same diseases
when they sit too close together, so quarantine new ZZ plants for a few weeks
before adding them to your collection.
A simple, well-draining setup works best for both stem propagation and leaf
propagation:
- A clear glass jar or vase for water rooting (so you can watch progress).
- A small new pot (4 inch) with drainage holes for soil rooting.
- Fresh potting mix amended with perlite to fill the new pot.
- A warm spot or a warm area with bright light (not direct sunlight, which
scorches young plants). - Optional: a small dip of rooting hormone on the cut end to root faster.
- Optional: a clear plastic bag to create a humidity dome for low light or
cool rooms.
If you follow this process and stay patient, successful propagation is the
likely outcome — you’ll form new plants for free, propagate ZZ plant cuttings
to gift, and slowly develop your ZZ plant collection. The fastest way to propagate
ZZ plants is still root ball division, but for most home growers a stem
cutting in soil or water is the easiest way to root a ZZ plant the first time.
How to propagate a ZZ plant: the short version
If you came here wondering how to propagate a ZZ plant the easiest way, the answer for most home growers is simple: divide an existing mature ZZ plant if you have one, or root a ZZ plant stem cutting in water if you don’t. Either way, you’ll grow a new ZZ plant from your existing collection without buying anything new.
ZZ plant leaf vs ZZ plant stem cutting — which to start with?
If you can choose, start with a ZZ plant stem cutting rather than a ZZ plant leaf. A stem cutting carries more stored energy than a single ZZ plant leaf and reaches a transplant-ready rhizome faster. Use a ZZ plant leaf only when you have stranded leaves with no stem available.
Quick reference: ZZ plant propagation methods at a glance
This ZZ plant propagation overview ties everything together.
- Stem cutting in water or soil is the most common way to propagate a ZZ plant when you have a healthy stalk to spare.
- Soil propagation with a well draining soil mix (potting mix plus perlite) is the route most growers settle on for stronger root system development.
- Water propagation lets you watch the ZZ plant cutting develop a rhizome before it builds a real root system.
- Root ball division gives you a brand-new ZZ plant in one to two weeks if you have a mature ZZ plant with multiple stems coming out of the soil.
A few things every ZZ plant owner should know:
- Root rot is the most common reason a ZZ plant cutting fails. Use a well draining soil mix and avoid overwatering — that’s how you give new roots and root growth a chance.
- Indirect sunlight is the right level of light for new ZZ plant cuttings; direct sunlight will scorch the leaves of young plants and slow rooting.
- Bright indirect sunlight through an east-facing window is ideal for both stem cutting and leaf cutting setups.
- Repotting a propagated ZZ plant into its first pot should happen once you see at least an inch of new roots and a visible rhizome at the base.
- Houseplants like the ZZ plant from eastern Africa are slow growers — be patient, and don’t move them around too much during early growth.
- Rooting hormone isn’t required, but it can help root faster in soil propagation, especially with cuttings of a single stem.
The fastest way to propagate ZZ is root ball division of a mature ZZ plant. The slowest is single leaf propagation. Stem cutting in water or soil sits in the middle and offers the best balance of speed, success, and visibility for most ZZ plant owners trying to establish more plants from their existing collection.
FAQ — common myths and questions
Five questions that aren’t answered well in standard guides.
Can I put a single leaf back in the mother plant's soil and have it root there?
No. ZZ plant leaves only root from the petiole, and the mother plant's soil has too much moisture and root competition for a leaf to establish. Even if the petiole survives, no new rhizome appears in those conditions. Take the leaf out and propagate it separately.
My ZZ plant stem broke. Can I still propagate it?
Yes, this is one of the better salvage scenarios. Trim the broken end with sterile shears to get a clean cut, let it callus 24–48 hours, then root in water or soil exactly like a planned cutting. The success rate matches a deliberately-taken cutting (~75%).
Is rooting hormone necessary for ZZ?
Optional. ZZ plant rhizomes develop whether you use rooting hormone or not — the rhizome is genetic, not hormonal. Rooting hormone slightly accelerates root formation after the rhizome appears, but doesn't influence whether the rhizome appears at all. Skip it if you don't already have it.
My rhizome emerged 3 months ago but still no shoot. Did I fail?
Probably not yet. “Rhizome stall“ is real — sometimes a rhizome sits dormant for 2–6 months before pushing a shoot. If you've waited 6+ months with a healthy rhizome and no shoot, the most common rescue is to pot it in soil, add a heating mat, and wait another 2–3 months. Many stalled rhizomes shoot once the substrate changes from water to soil.
Can I speed this up with grow lights?
Slightly. Light affects shoot growth after rhizome formation but not rhizome formation itself — that's controlled almost entirely by temperature. If your propagation has stalled, prioritise a heating mat over a form light. If rhizomes have formed and you're waiting for shoots, then yes, a develop light at 6,500K for 10–12 hours/day will speed visible growth by roughly 30–50%.
Disclaimer: GardeningNorm is a participant in the Amazon Services LLC Associates Program and may receive a commission if you purchase a product via a link on this page.. However, this does not impact our reviews.Read the full disclosure here.